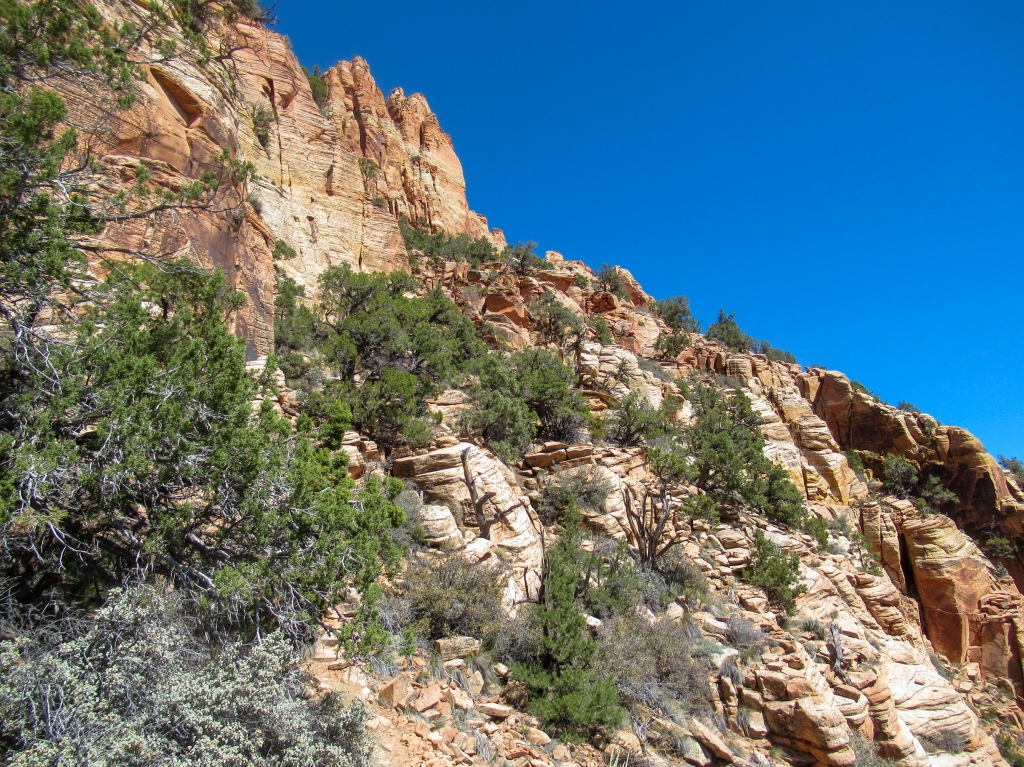
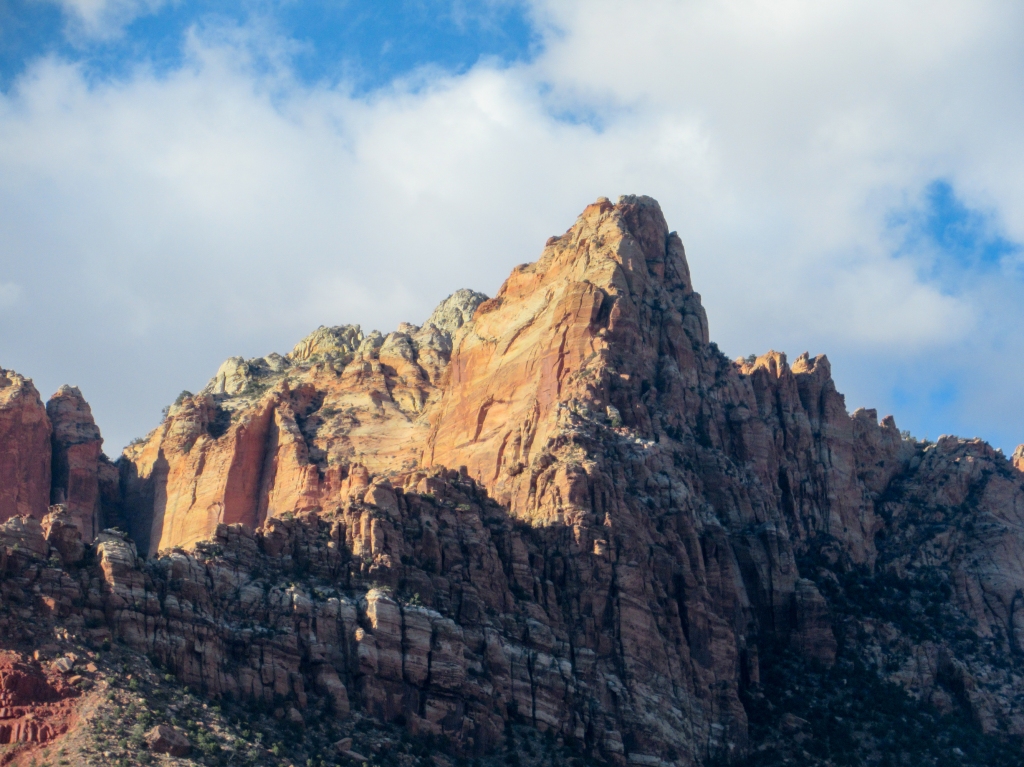
In the southern reaches of Zion National Park, seemingly lightyears away from the rambunctious crowds of the main canyon, Mount Kinesava soars above the surrounding desert plains. Access to the 7,000+ foot peak is largely trail-less, steep and difficult, presenting a barrier to entry for most hikers, while an enticing challenge to others.
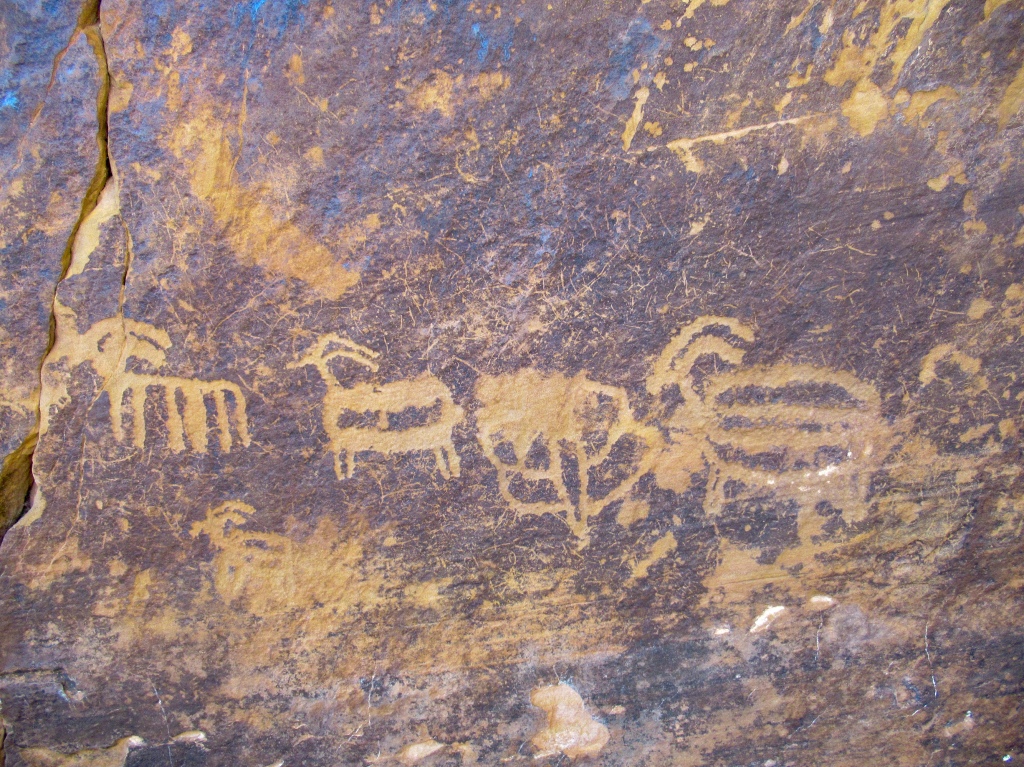
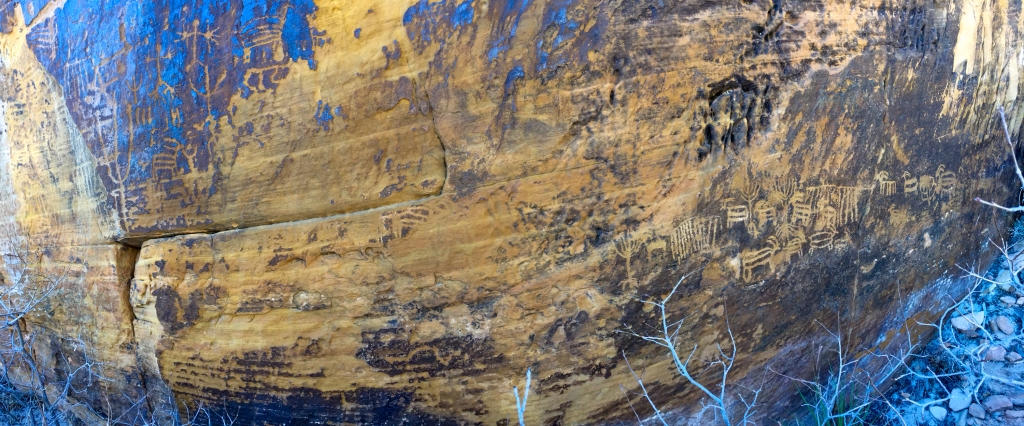
Despite the relentlessly steep terrain and sheer sandstone cliffs that deny any easy route to the peak, the top of Mount Kinesava is no stranger to human steps. People have been setting foot on its summit presumably for thousands of years, evidenced by the Native American petroglyphs etched into the weathered walls of the mountain’s upper plateau. In a place where you likely won’t see another human, there is a unique feeling of companionship and camaraderie when you reach the mountain top. You acquire an appreciation for those that completed the feat thousands of years before you without hiking shoes, water bottles, or Clif Bars.
Kinesava is the Paiute deity of trickery, a fitting name for a mountain that deceives, seeming to grow in height and difficulty as you ascend its sharp, outstretching slopes.
As an avid backpacker, Zion National Park has been on my mind for years. However, I live in coastal California and am surrounded by a multitude of world-class backpacking destinations, so the high desert of southern Utah had eluded me for locations that are easier to get to. In 2019, I decided that the time had arrived to visit Zion, an appropriate gift to myself for my 27th birthday.
My original plan was to complete a three-night trek through the national park, but those plans were squandered by heavy snowfall this winter. I began looking for day hikes that would be equally as exhilarating.
As I was browsing the internet for options, Mt. Kinesava continually caught my eye. The challenge of trail finding, the 3,500 foot ascent up brick-red sandstone, the petroglyphs hidden near the mountain’s peak, and the solitude away from the crowds all spoke to me. I knew this was the hike that would highlight my trip to Utah.
The challenge of trail finding, the 3,500 foot ascent up brick-red sandstone, the petroglyphs hidden near the mountain’s peak, and the solitude away from the crowds all spoke to me.
I like to be over-prepared for my hikes and my preparation for Mt. Kinesava was no exception. I scoured the internet for information and pictures of the hike and surprisingly enough, there isn’t a whole lot of great information out there. I pieced together trail reports, maps, images and post comments to map out the hike in my head.
I figured that this post could fill that void and serve the purpose as a trail guide for those who are planning on or contemplating doing the hike. (This post had the best description that I could find online, but the photos are too small to provide helpful visual aid.) My goal is to create a trail guide, as well as a trip report from my own experience.
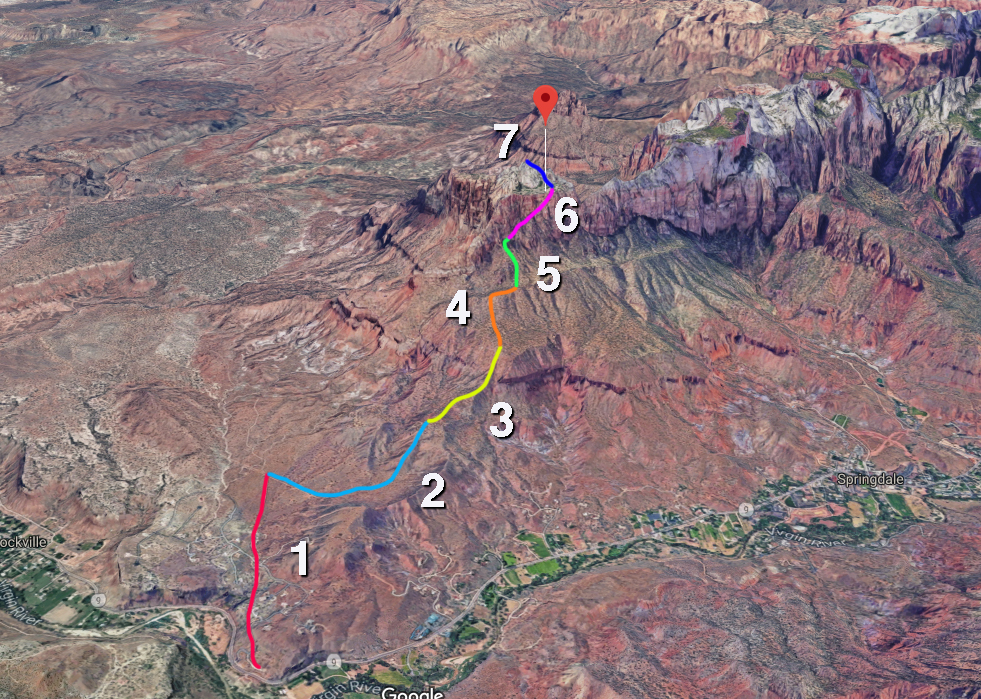
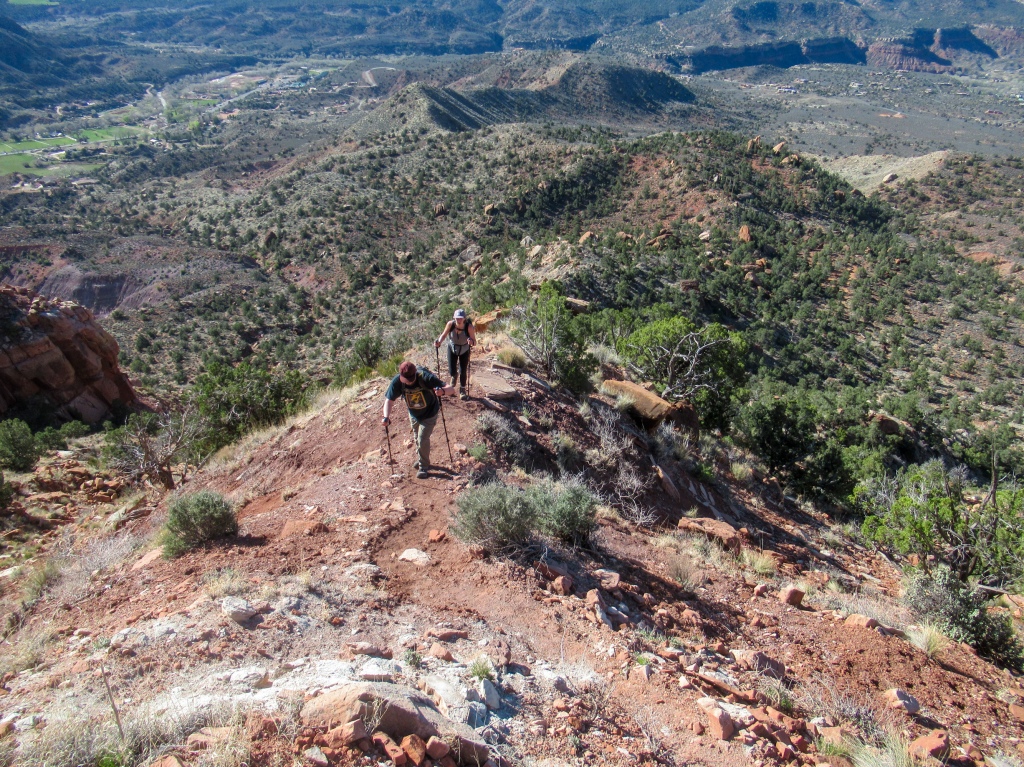
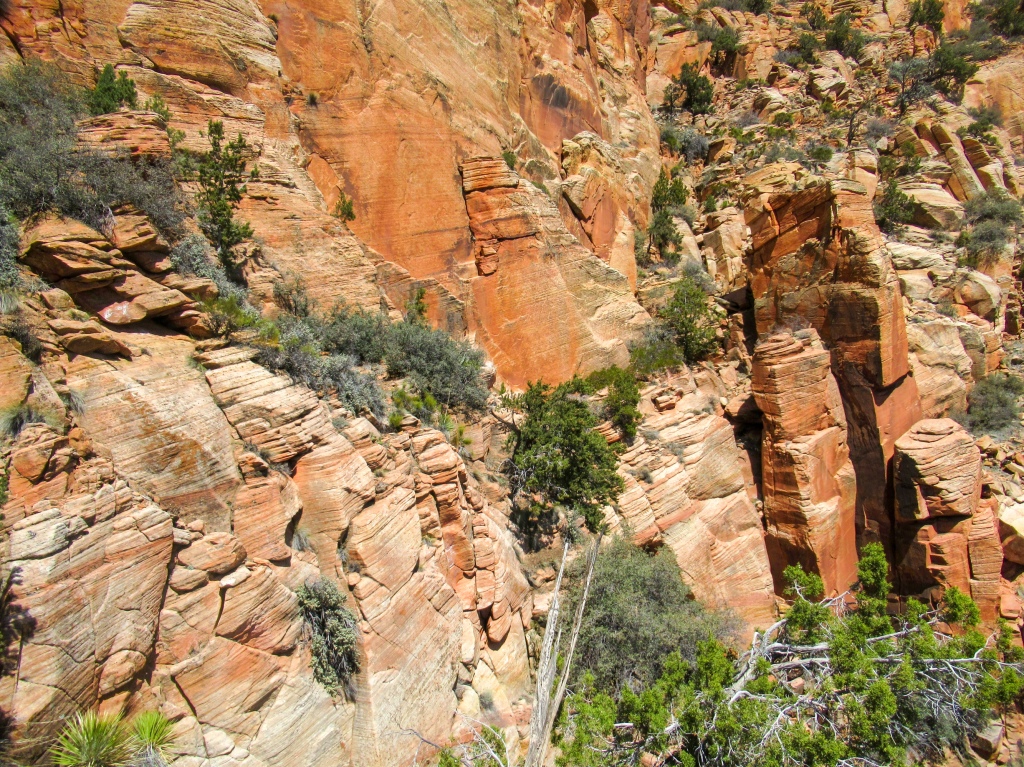
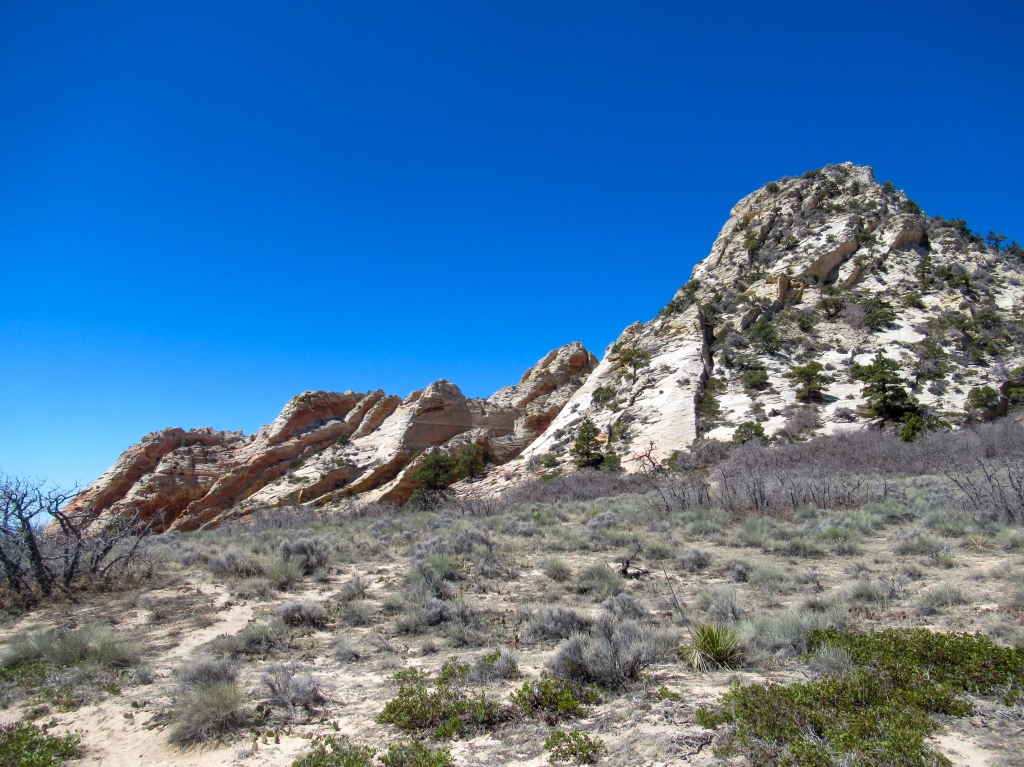
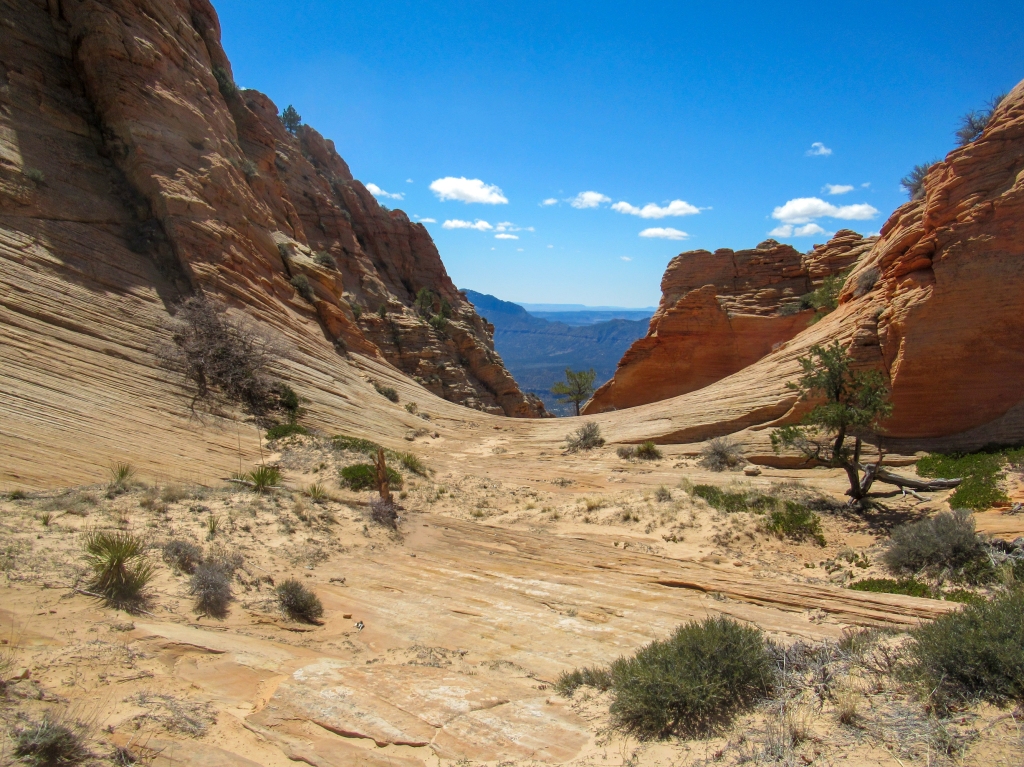
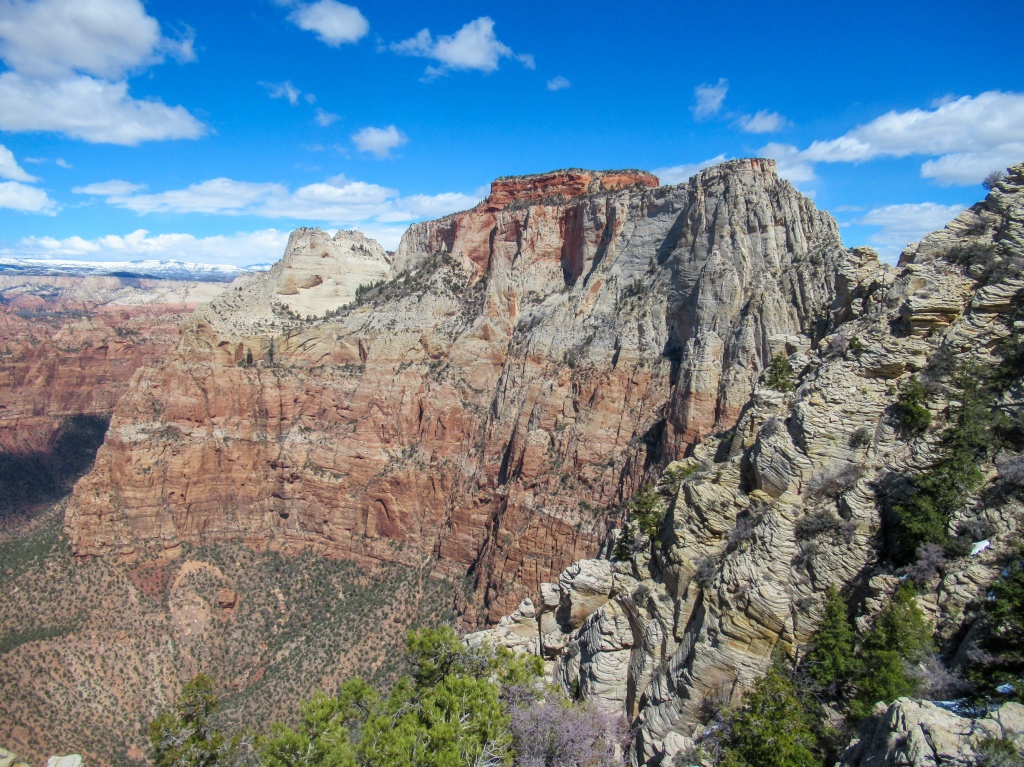
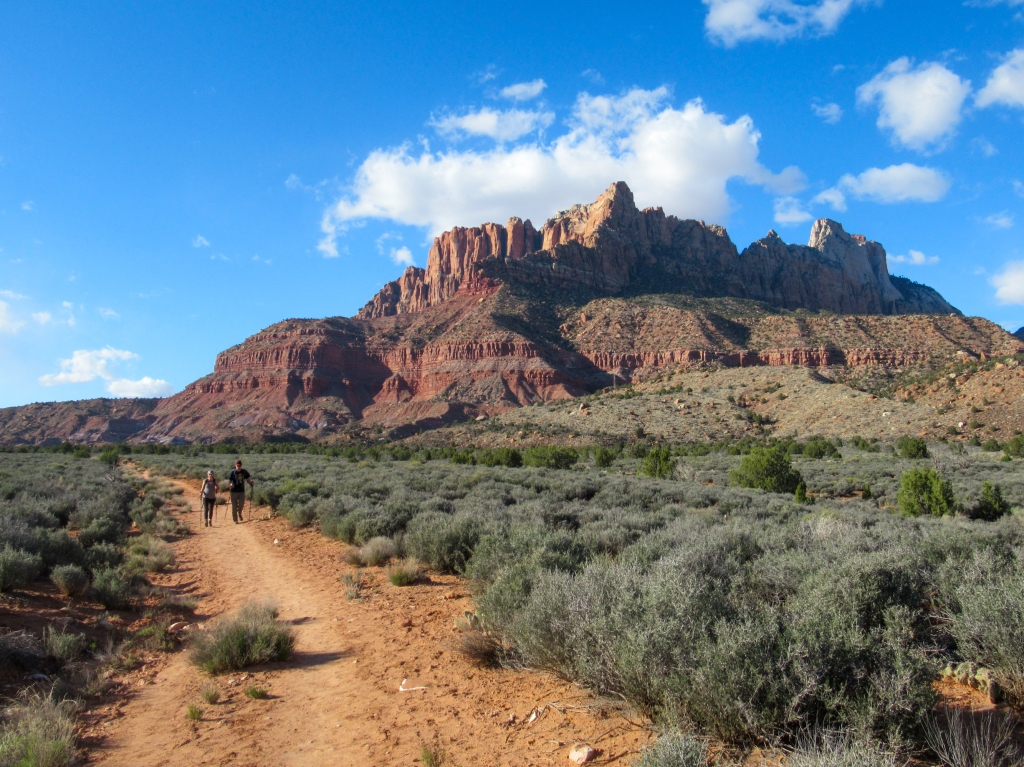
To describe the route up to the top of Mt. Kinesava, I broke the hike down into seven sections that you can see on the map below. The hike starts at the parking lot of the Chinle Trail outside of the national park boundaries and uses a series of ‘weaknesses’ — breaks in the cliffs where steep sediment creates a path up to the next cliff layer — to gain the summit. The final section of the hike gets very steep and turns into more climbing than hiking before leveling out to a large plateau from which the true peak protrudes another 500 feet or so.
No matter how well you feel you know the route, I recommend downloading the route on All Trails, which I used as a GPS guide to corroborate our actual path.
Key
1 – Chinle Trail
2 – First ridge
3 – Second ridge
4 – Third Ridge
5 – Up to the cliff base
6 – Class 3-4 climbing
7 – Upper plateau + peak
Mileage round trip: 8.1 miles according to All Trails (I somehow logged 11 miles on my iPhone, not sure which is correct)
Elevation gain: 3,537 feet
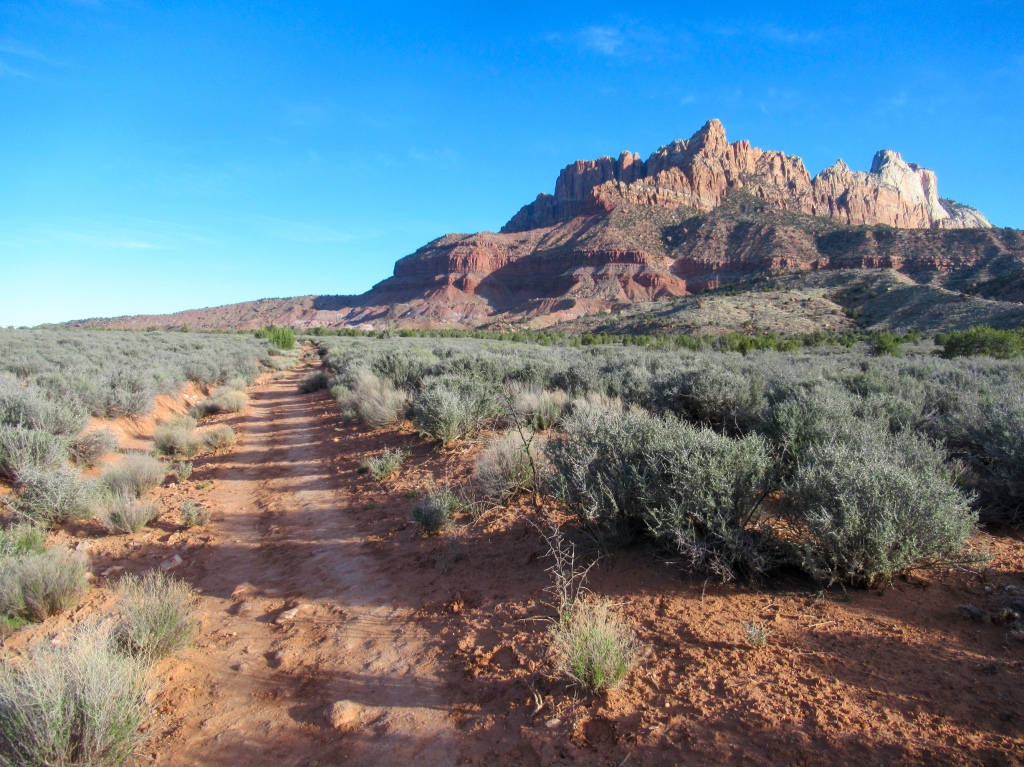
Just getting started: Chinle Trail + first ridge
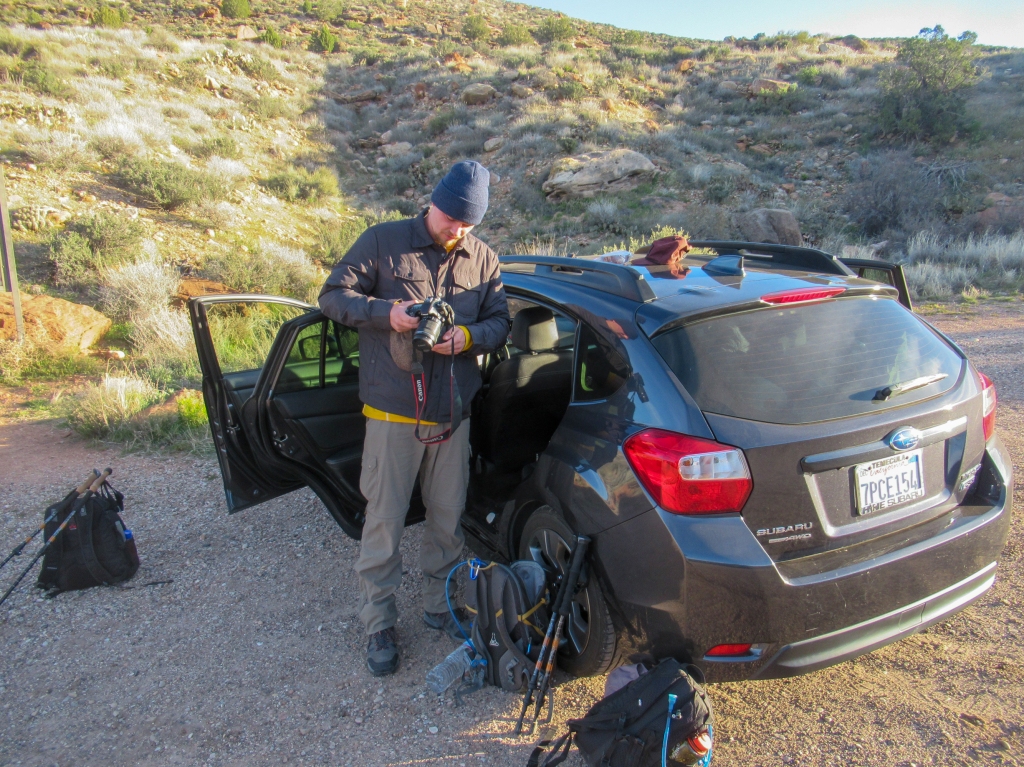
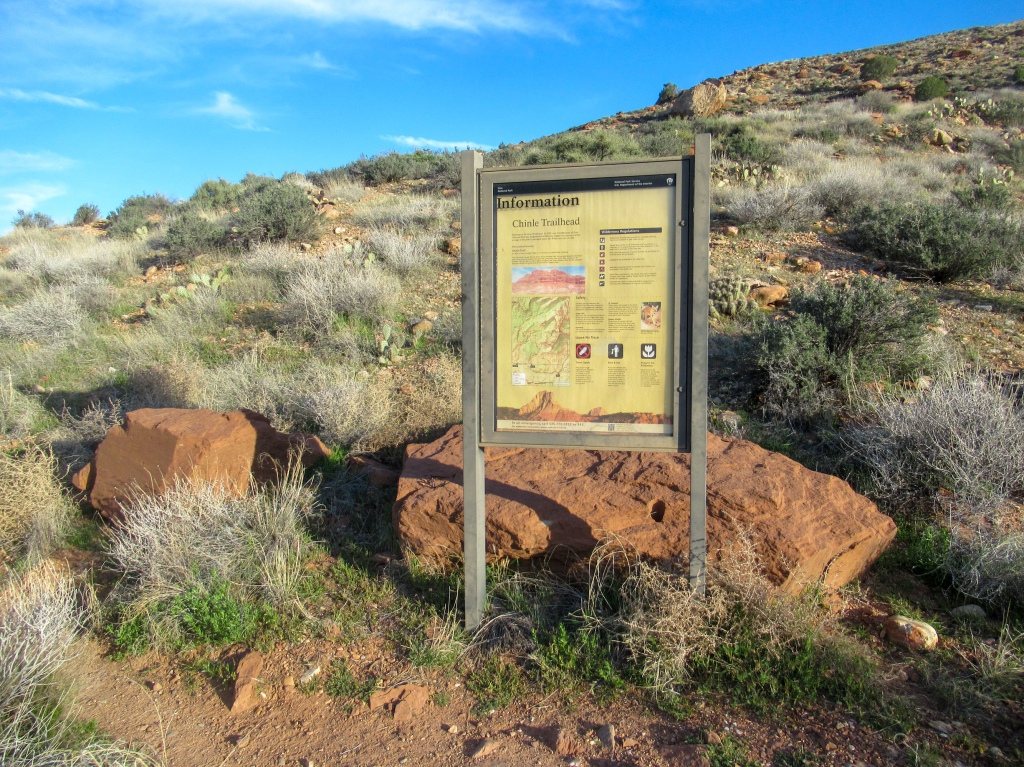
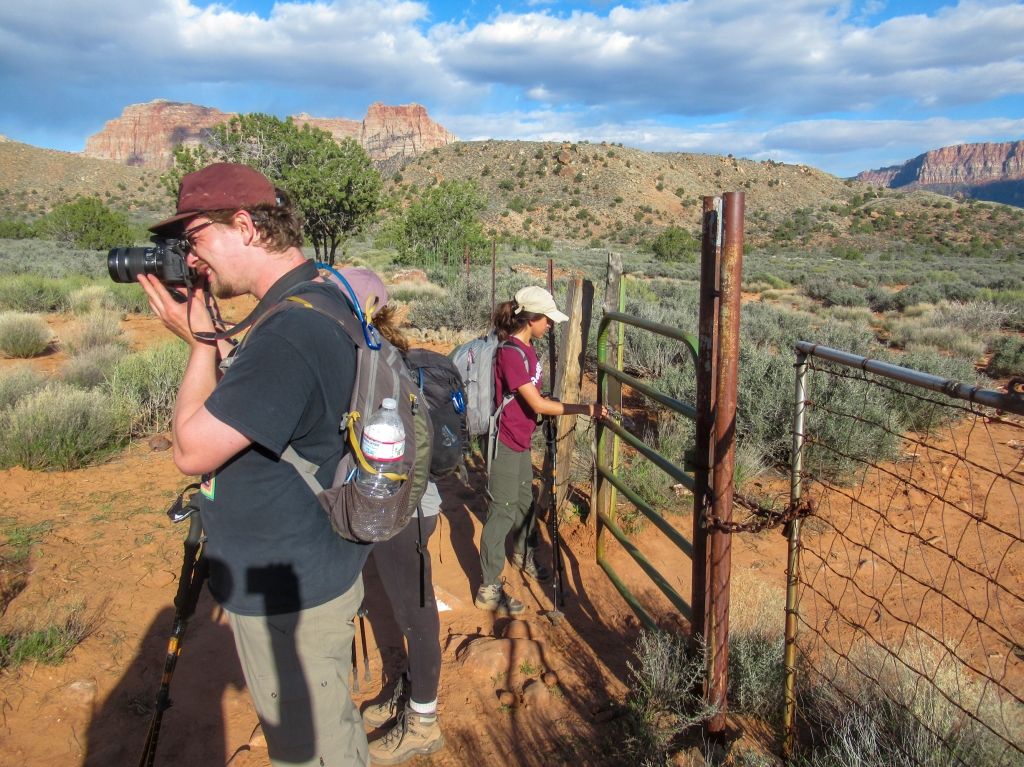
The start for this hike is the Chinle trailhead just outside the park. There’s an ample dirt lot to park in. We were just one of two cars there when we started and ended the hike. It’s crazy to think that just a few miles down the road dozens of cars are backed up to enter the national park.
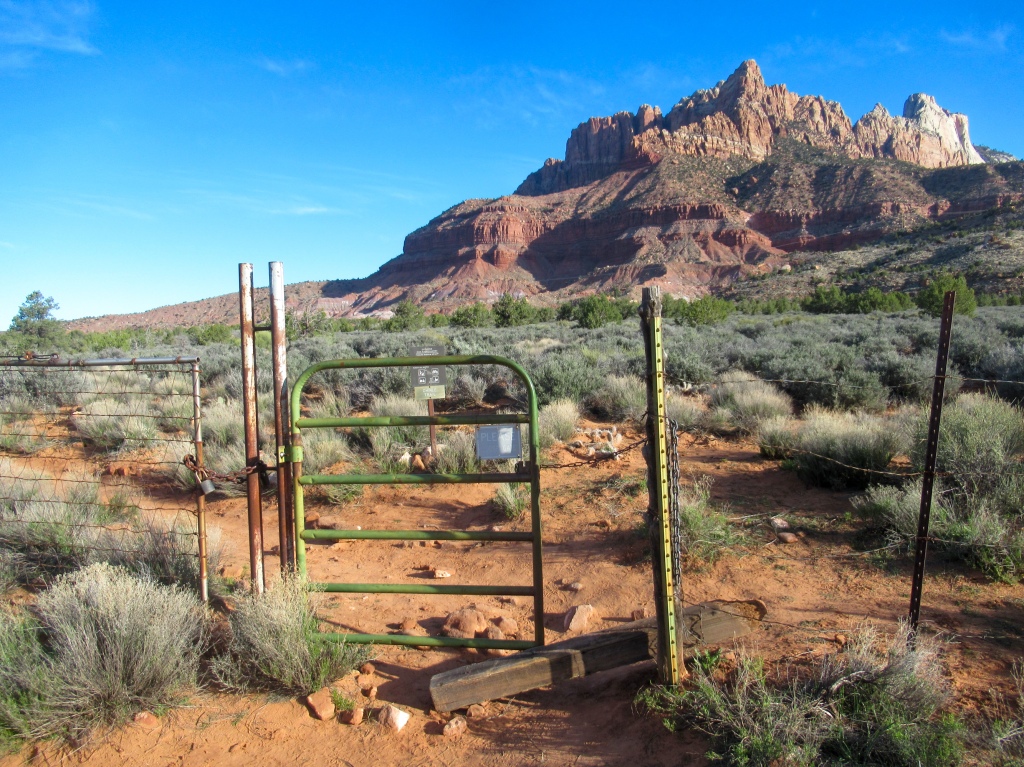
The trail starts out nice and easy, a good warm up for the thousands of vertical feet that lay ahead. Follow the Chinle Trail until you hit the gate that marks the entrance to Zion National Park. From the gate, you want to hang a right to the east and follow the fence for a bit, eyeing an access point to the next section, ‘first ridge’.
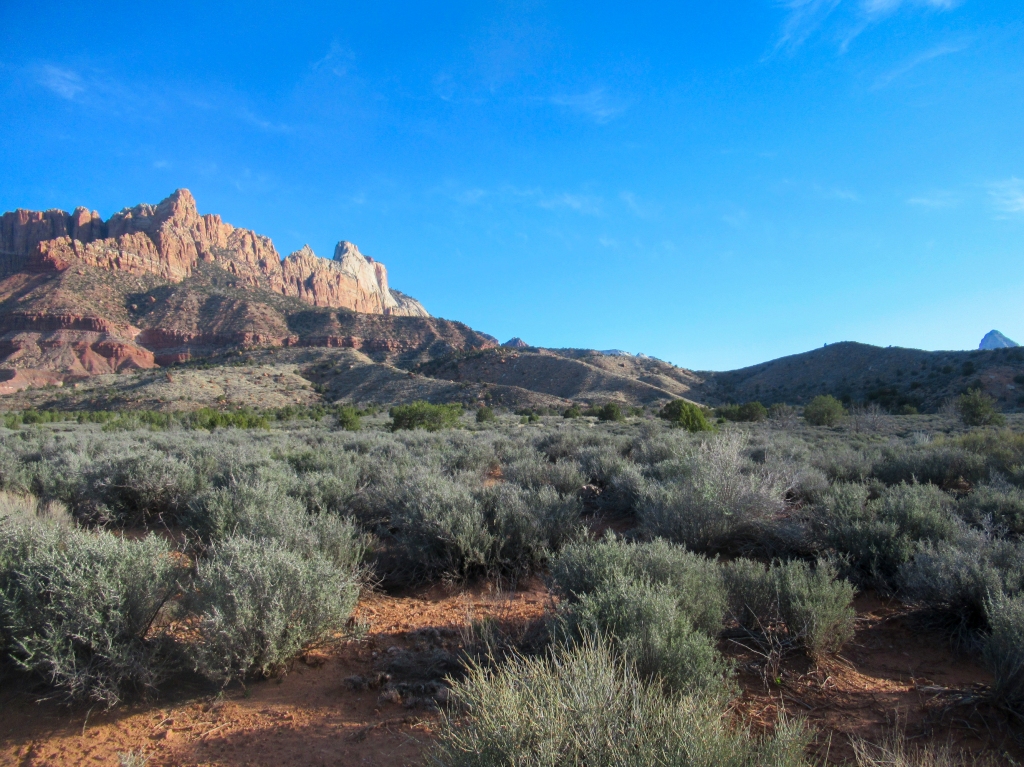
There is a prominent, seemingly impenetrable cliff band that surrounds Mount Kinesava like a moat. However, there is one, ever-so-slight break in the cliff where a steep trail lets you pass, marked ‘second ridge’ on my map. The goal is to get there. There are three ridges that you will find laid before you as you follow the boundary fence. You can pick any of these three ridges to accomplish the ‘first ridge’ section of the hike. The map on the All Trails app seems to have taken the west ridge, while we opted for the center ridge which seemed like the most direct path. The east ridge climbs up and then drops down a bit to meet the other two, adding unnecessary elevation gain to the hike, so I would say avoid that one.
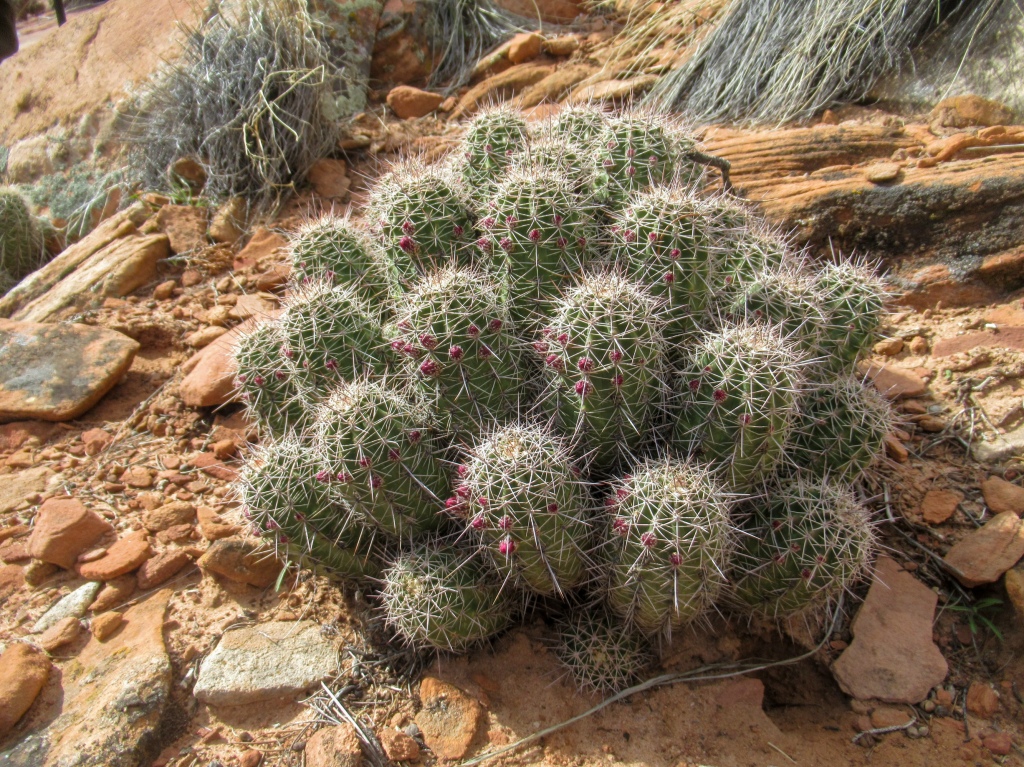
The flora of the southwest desert section of Zion includes an array of cacti and spiny shrub, some of which contain nearly microscopic spines. For this reason, we followed a wash up to the base of the first ridge, which was not the most direct, but provided a trail free of hazardous vegetation.
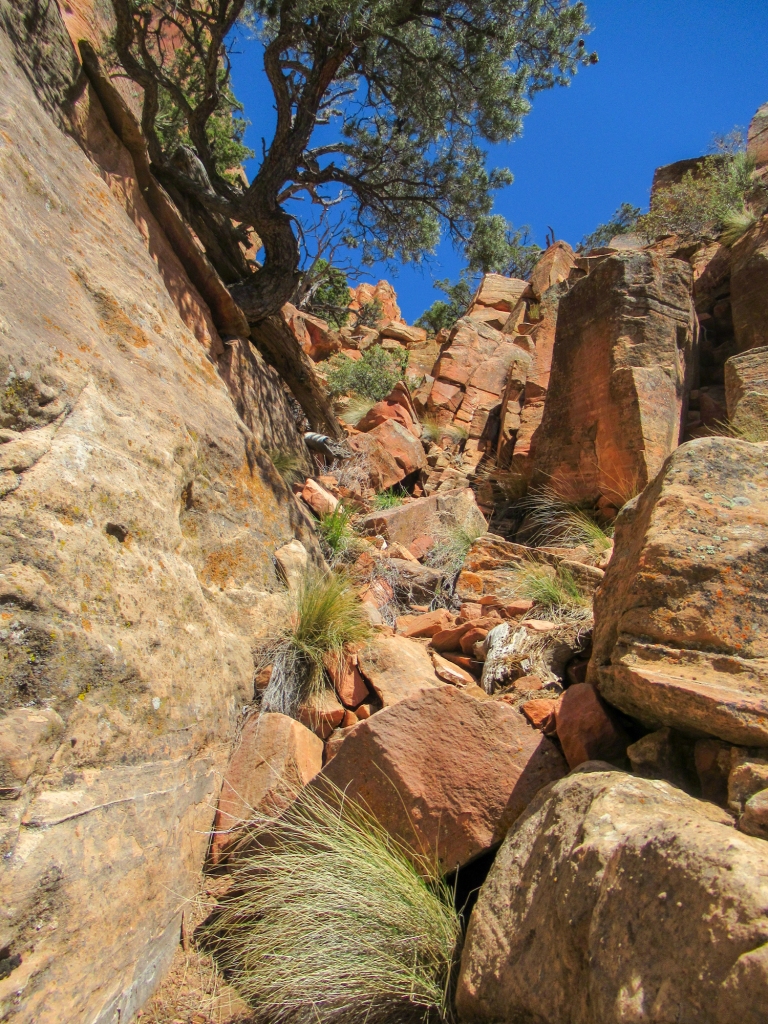
Keep going up: Second ridge, third ridge and cliff base
The first ridge ascent will get you huffing and puffing a bit, but the hardest sections of the hike still lay ahead of you.
The second ridge, which unlike the first set of ridges, is the only way to pass onto the next sediment layer. It’s much steeper and more challenging. The ridge does have the remnants of a trail, but the hike is much steeper, and the dirt condition is much worse. The dirt is loose and requires careful footing. Hiking poles were a life saver in this section, both for the added strength for hauling your body up thousands of feet and the extra sense of safety and balance in areas of unsure footing.
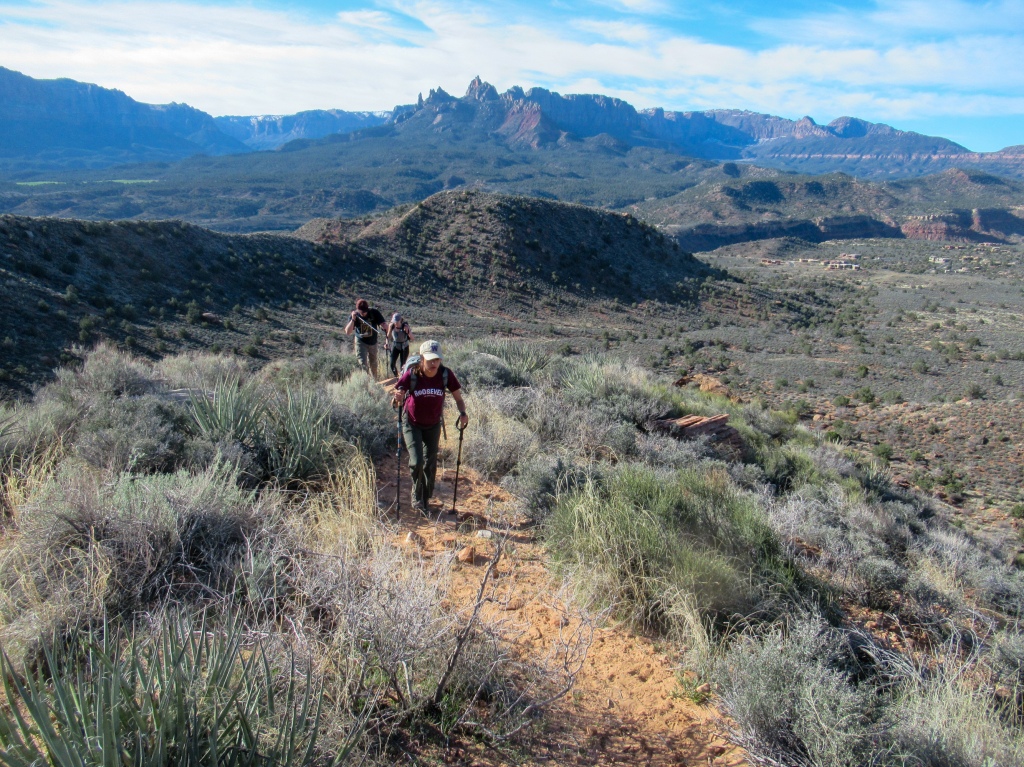
Power up the second ridge until you reach a plateau. From here, the faint trail that you were somewhat following before disappears. Navigational skills become crucial as there are any number of routes that you can take. You will now enter the section labeled ‘third ridge’. Aim towards the peak and meander through the hillside as you gain elevation. You may find yourself backtracking a bit as you hit dead ends or realize that there are easier routes than the section you chose.
Eventually, you will reach another ridge, follow this ridge to the right (northeast) until you top out. You’ll have to descend a short bit to start the next section to gain the base of the cliff side.
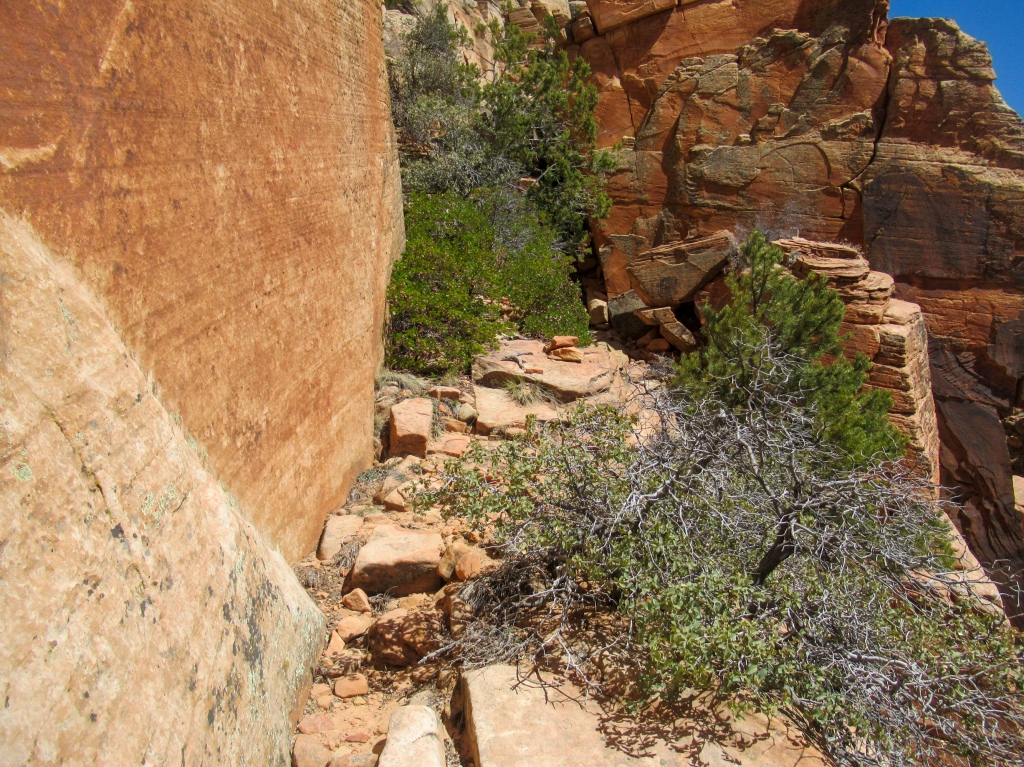
You now begin section 5, ‘up to the cliff base’, where you will do exactly as the title says. Physically, this may be the most challenging section, as it is similar in steepness to ‘second ridge’ and possibly contains worse footing with the loose dirt. You are aiming towards the vegetation line that heads up to the summit. After a tough section of ascent, take a well-deserved break and prepare for the climbing section of the hike.
Time to climb
When you reach the cliff base, this is a great time to take a break and size up the task that you have ahead of you, which is by far the most dangerous on the hike. You’ll need to climb up some very steep sections of sandstone to reach the upper plateau. This is a great moment to think hard about your coordination and level of physical condition after climbing thousands of feet. Think hard about if this is the right hike for you and do not give into commitment bias. Just because you hiked this far does not mean you need to continue.
As we were climbing to the cliff base, there was an older couple descending (the only other people we saw all day). They smartly decided that the climbing was not for them. They must have been in their sixties and I was utterly impressed that they have even made it to that point.
The man gave us a friendly hello and began to spew advice about hiking Mt. Kinesava. His passion for the mountain radiated with every word that left his mouth and it was evident that he had conquered the hike before, clearly during a more youthful stage of his life. I didn’t catch his name, but he explained in detail the rest of the route for us, and even directed us where to find the petroglyphs, which I was surprised by. Locals tend to be protective of their petroglyph sites, rightfully so. I was taken back by his positive attitude and trust in us, but I suppose the assumption is that petroglyph vandals will not go through the hassle of climbing thousands of feet. Those first two ridges will definitely weed out anyone climbing with the wrong intentions.
While his advice was greatly welcomed, it was all just reinforcing what I already knew. I had done my research on this hike. If anything, the encounter with this couple only planted some seeds of doubt as to the difficulty of the upcoming climbing section. “Well, they couldn’t do it, but we can surely do it, …right?”
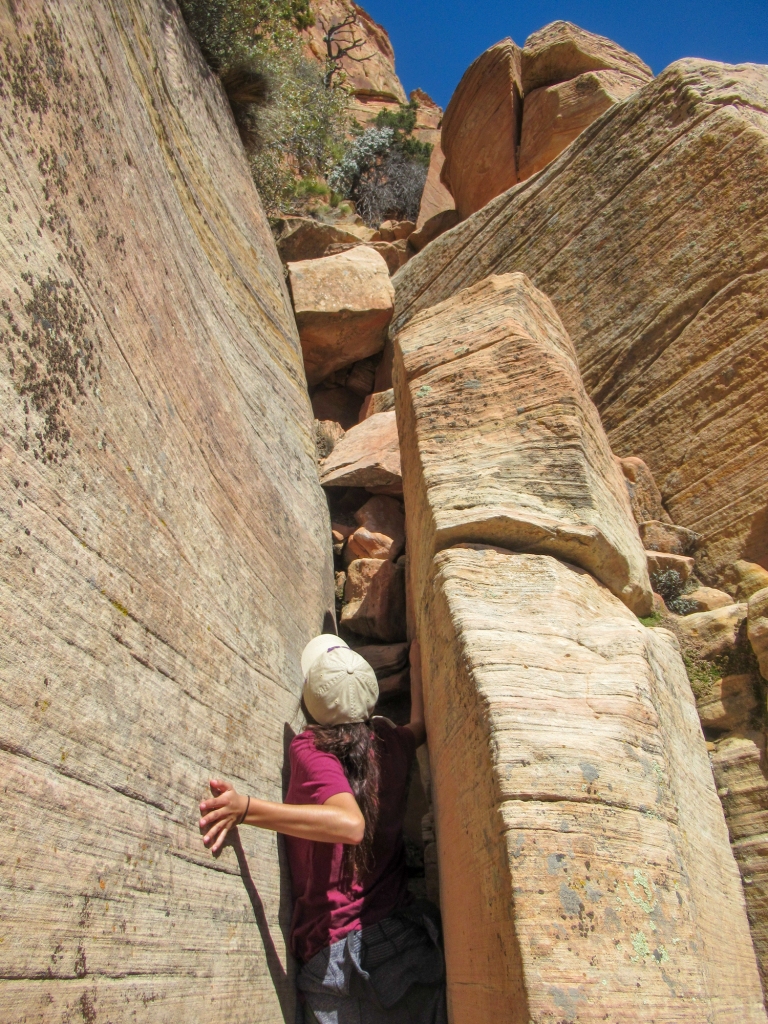
For anyone who doesn’t know the 1-5 climbing scale (don’t worry, I had to google it too), class 3 is described as “scrambling, a rope might be carried.” Class 4 is described as, “simple climbing, often with exposure. A rope is often used. A fall on Class 4 rock could be fatal. Typically, natural protection can be easily found.”
Now, I had not done much climbing outside of some boulder scrambling and a recent belay certification course that I took a few weeks prior. I honestly did not know what to expect, and the low quality photos that I was able to find of this section online exacerbated my doubts.
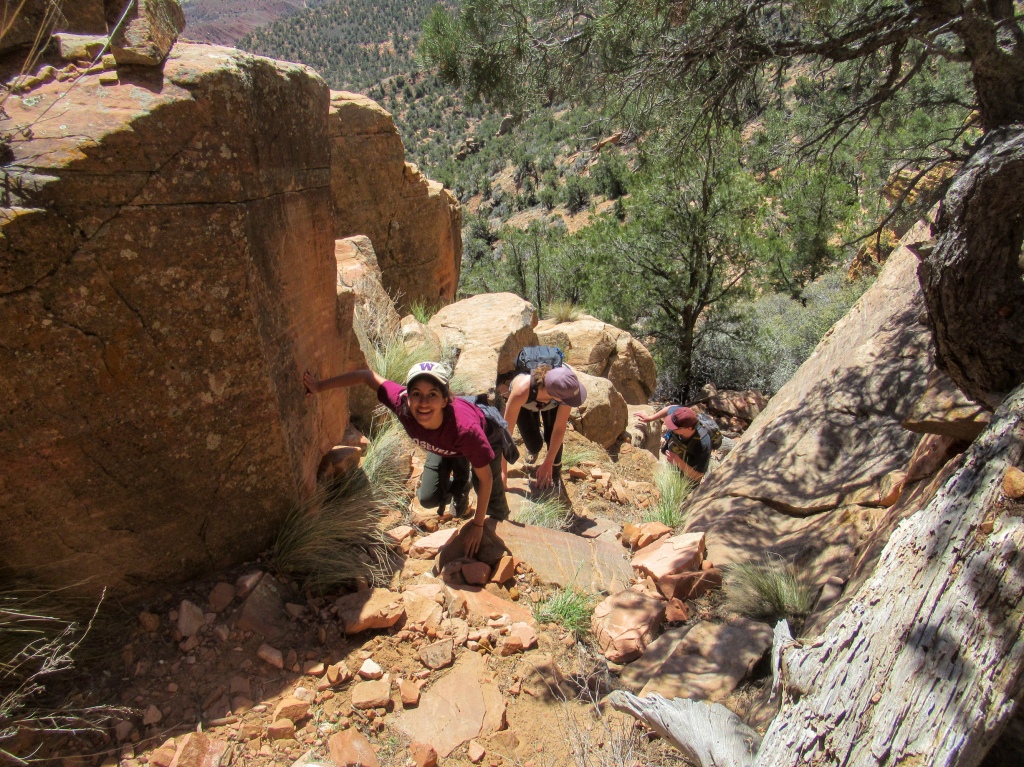
We used the area where the climbing began to stash our unnecessary items, bringing only the bare essentials with us to the top so my backpack would become less burdensome when making technical moves up the rock. We brought a bottle of water, what food we had left (we didn’t want to leave it behind for the squirrels to find), and some remaining light-weight items that wouldn’t make a difference if left behind or not. Hiking poles, empty water bottles, and shed layers of clothing were dumped.
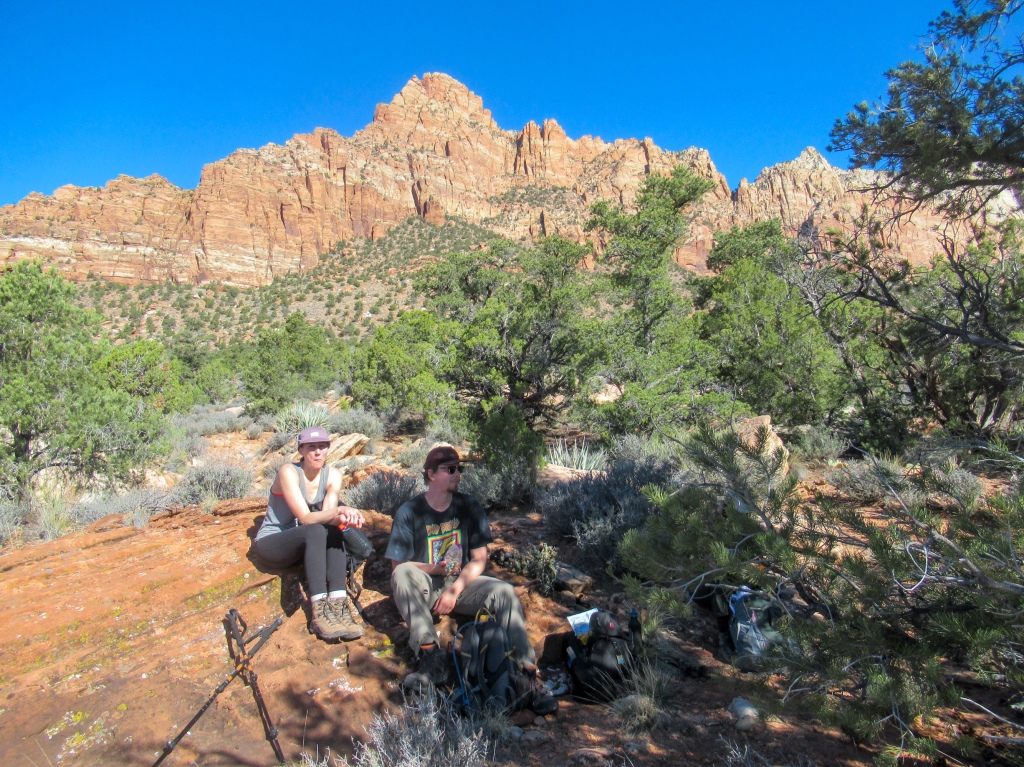
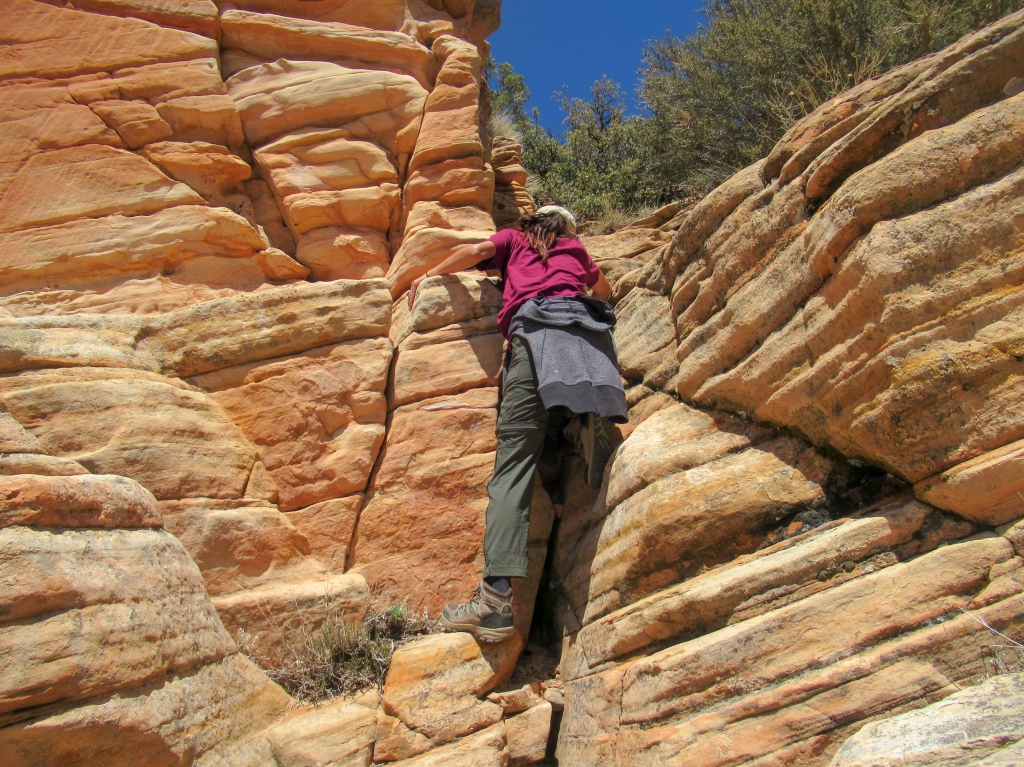
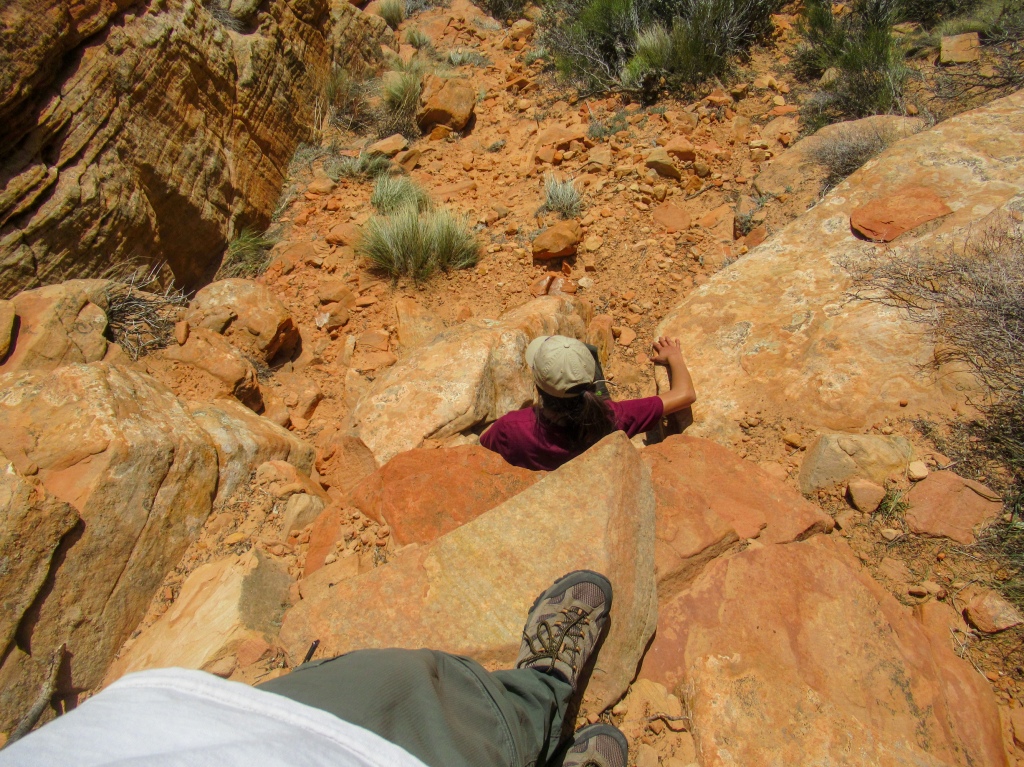
The climbing is generally class 3, broken up by a few more challenging class 4 sections. The climbing section is divided by the “cat walk”, which is a cliff band about five to six feet wide that connects the dots on the climb. This section definitely has the most vertical exposure, but is not the most dangerous section. I had read countless people talk about how spooked out they were about this part, but frankly it wasn’t so bad. If you can walk on a sidewalk without falling into the street, you can do the cat walk. This is where my brother, Nik, and his girlfriend, Carli, decided to call it a day and myself and my girlfriend, Madison, pushed on.
The climbing section is divided by a section called the “cat walk”, which is a cliff band about five to six feet wide that connects the dots on the climb.
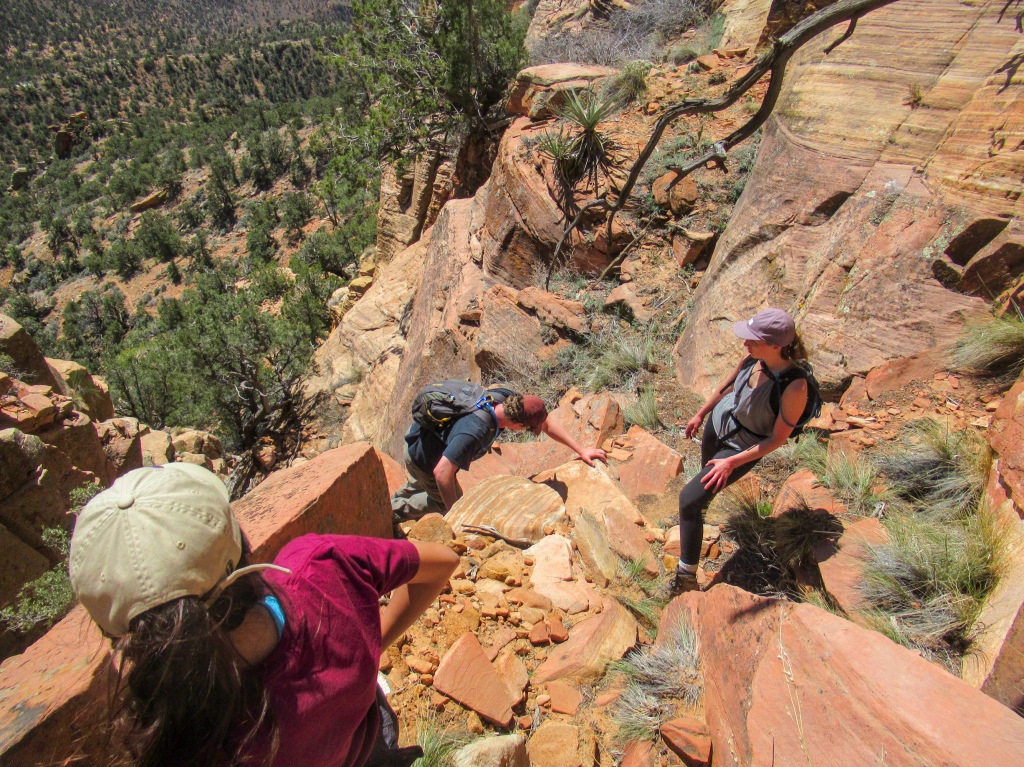
Directly following the cat walk there are a few chest-high ledges, which in my opinion are the hardest of the hike.
Meticulously selecting every step and hand hold and with the use of a little teamwork and motivation, Madison and I soon topped out at the plateau, with the true peak of Mt. Kinesava looming above us.
The reward: Petroglyphs and a final push to the peak
Once you have arrived at the plateau, the hardest hiking and climbing is behind you. The route to the peak of Mt. Kinesava from here is class 3 climbing at best, mostly just steep hiking on loose dirt. If you still have some gas left in the tank, push on for the last several hundred feet of elevation gain to reach the peak.
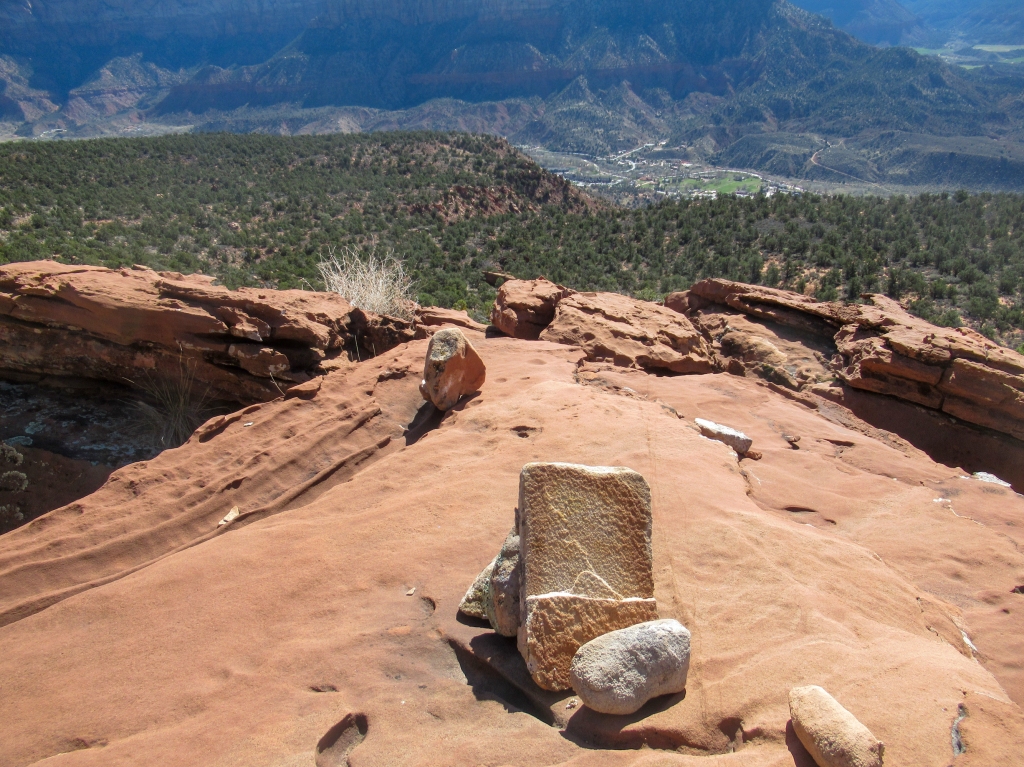
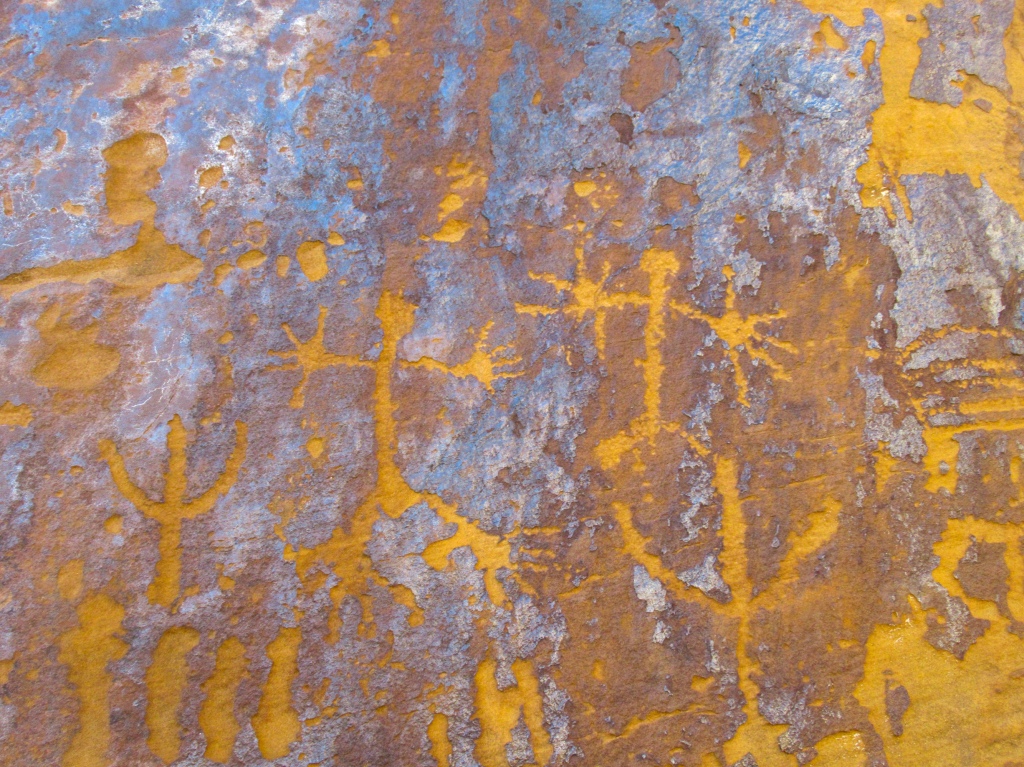
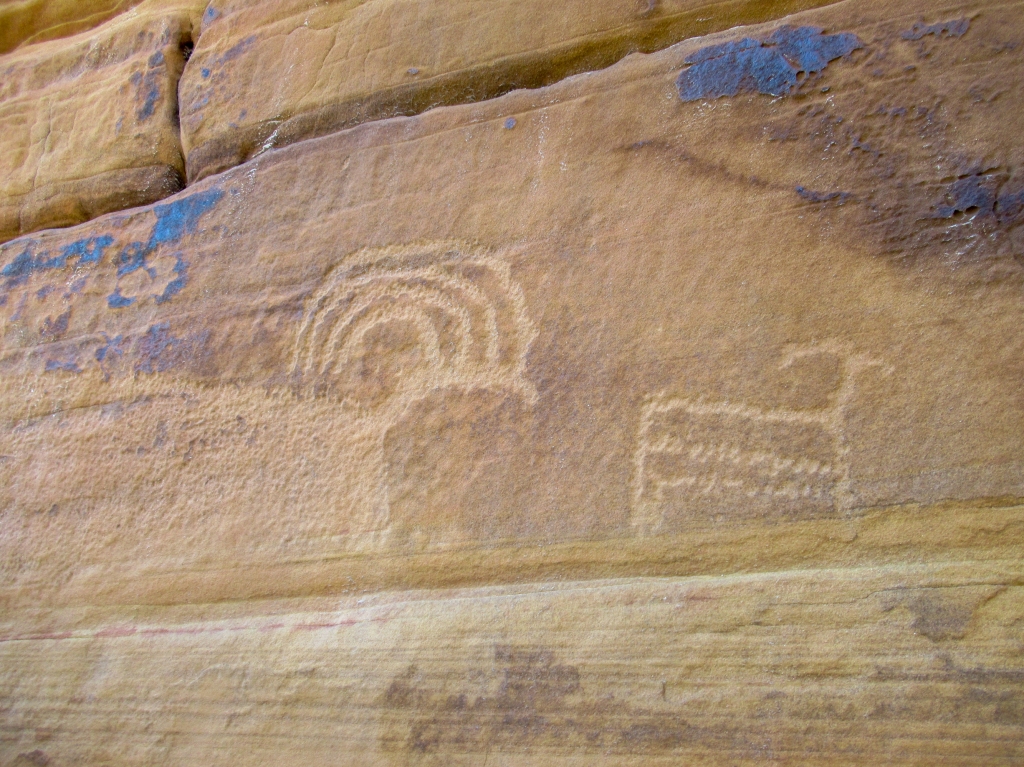
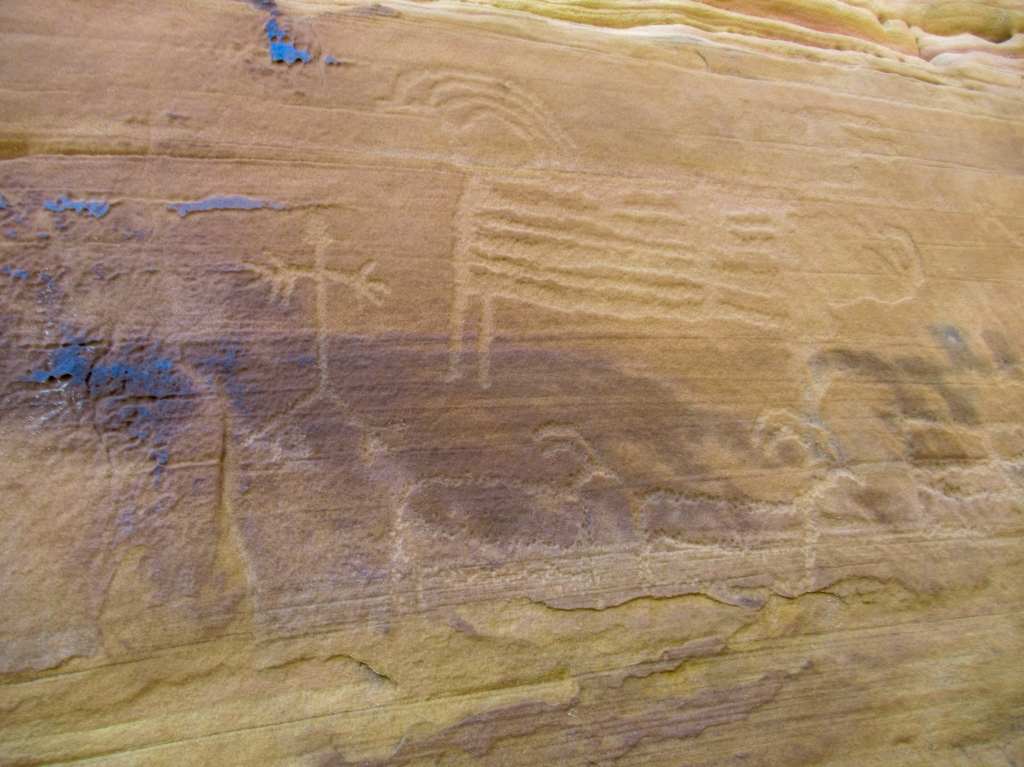
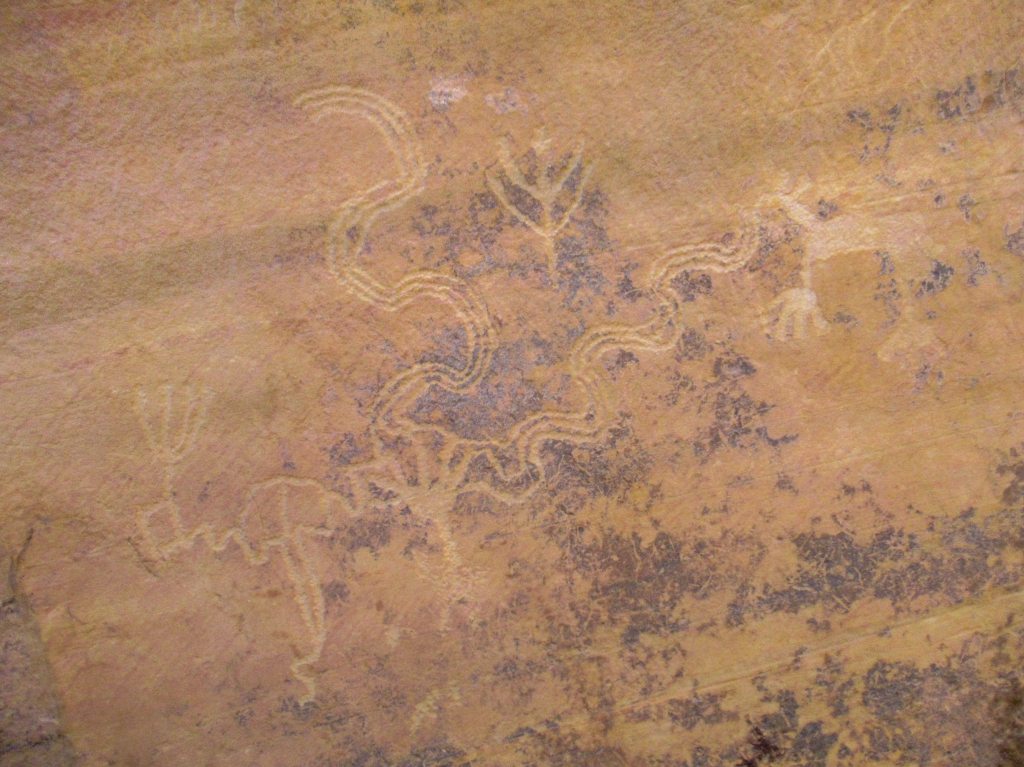
First, to catch your breath, go on a stroll across the flat plateau to search for the Native American petroglyphs. I won’t disclose the exact location to respect the locals that protect these sites, but I can say that they are in the above photo and that there are specific directions online that will lead you there (exactly how I found them).
The fascinating part of experiencing petroglyphs is putting yourself in the shoes of the artist.
The petroglyphs feature a spectacle of various of designs including sheep, humans, trees, spirals, and seemingly abstract lines. The fascinating part of experiencing petroglyphs is putting yourself in the shoes of the artist. The truth is, no one knows for certain what they mean. That has been lost with the millennia. These particular petroglyphs clearly must have a significant, sacred purpose, due to the fact that they are on top of a mountain thousands of feet above the valleys below in a location that would have been excruciatingly difficult to reach with the technology available at the time. If they were keeping track of how many sheep they had, that could have been done in a more convenient location.
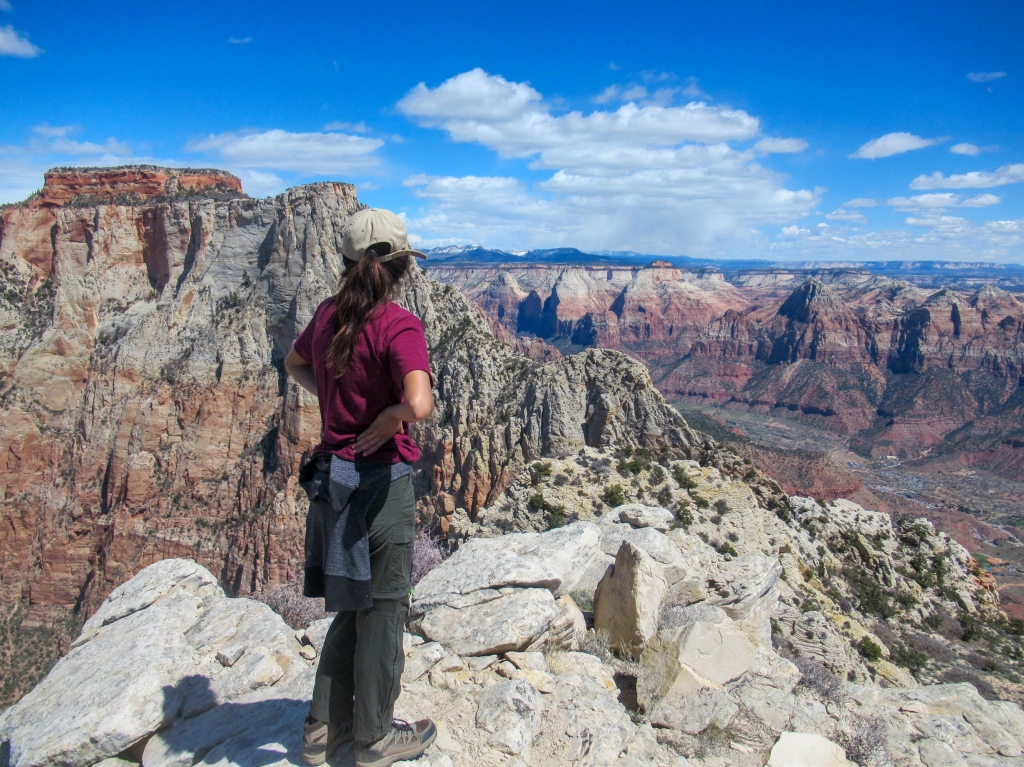
Once your fascination is satisfied exploring the petroglyph walls, it’s time to summit the peak for a 360 degree view of Zion and the surrounding area. From what I understand, there is no correct way to get to the top, but I started on the slopes of the smaller peak and crossed over to the higher peak when they met at a saddle. No technical climbing was required, just difficult hiking on loose dirt.
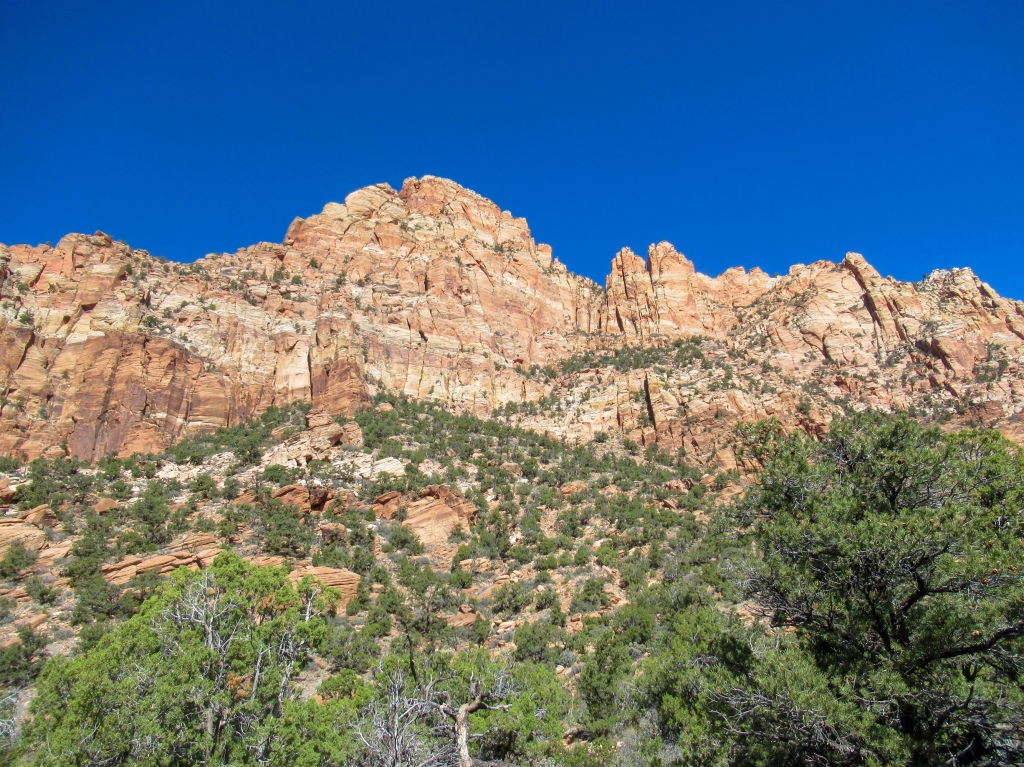
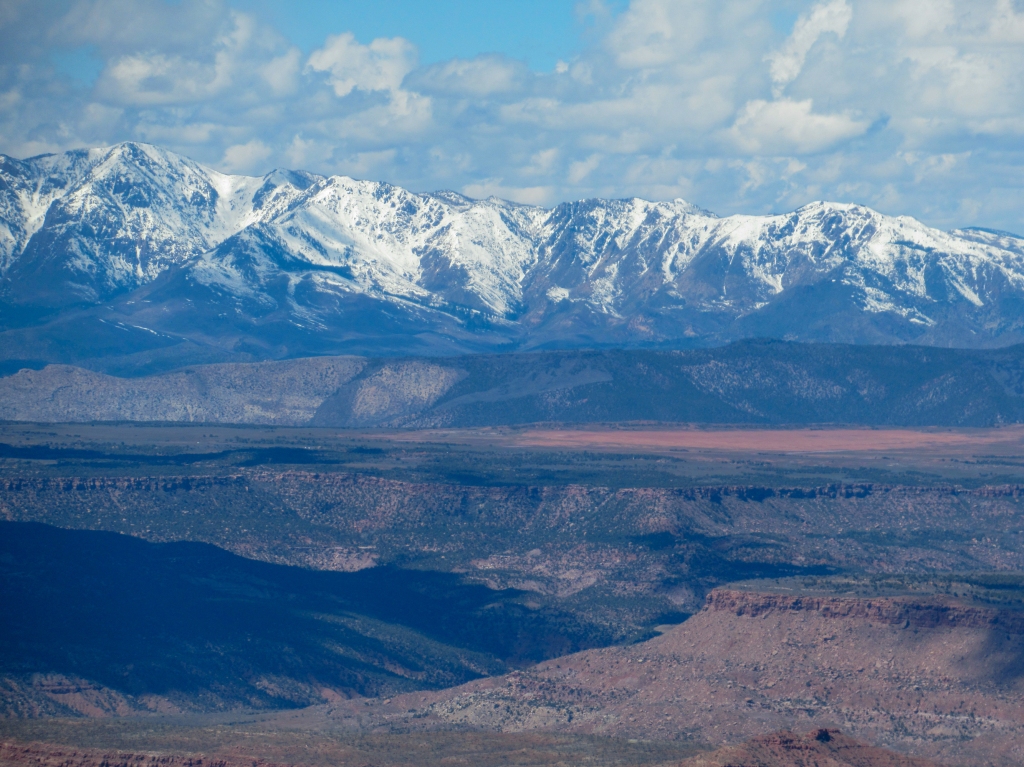
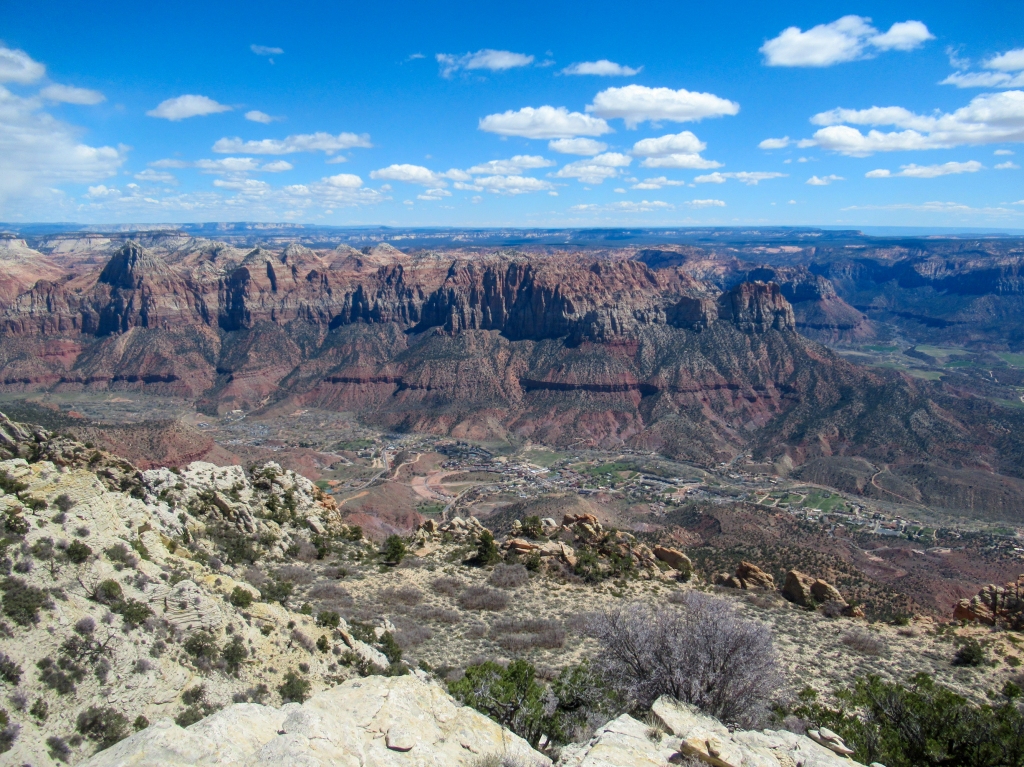
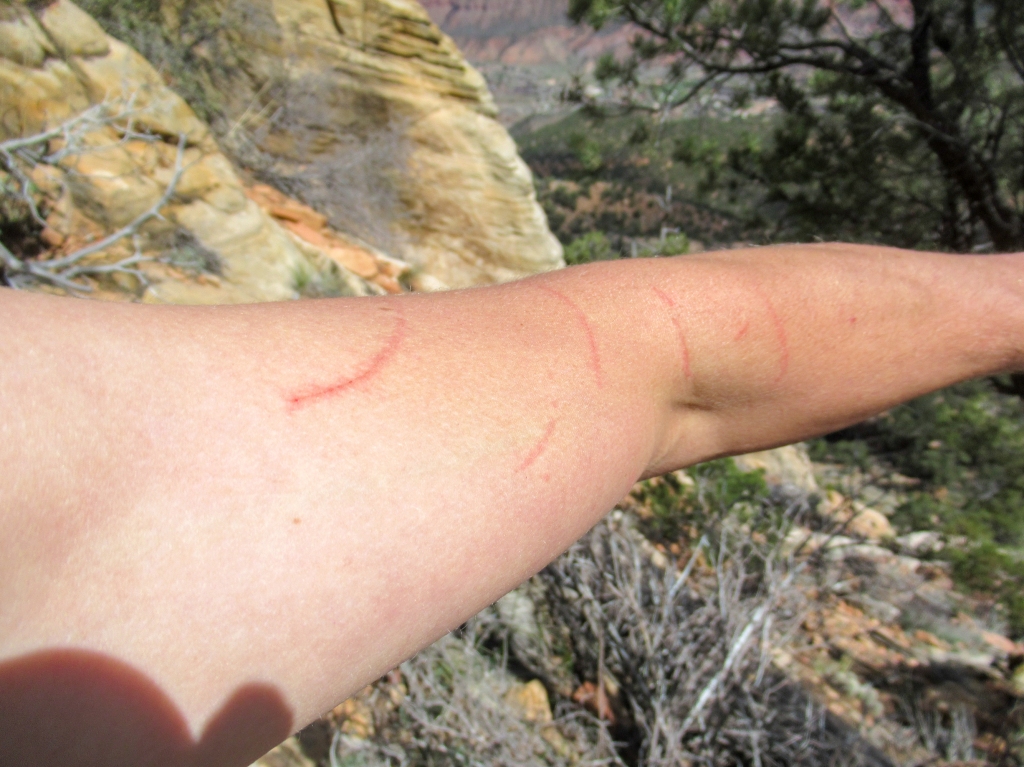
The top of Mt. Kinesava does not disappoint. To the northeast you get views of the classic peaks of Zion Canyon, including the neighboring West Temple, the highest peak in the park. Off to the west you can see the snowcapped 10,000 foot + peaks of the Pine Valley mountain range. And to the south, you can see far off into the distance towards the mountains that rise to form the north rim of the Grand Canyon. It’s a reward well-worth the burning calf muscles and cactus spines embedded under your skin.

What goes up, must come down
After enjoying the peak, retrace your steps down the mountain. Either knowing the route well or having GPS is exceedingly important on the way down. As I explained, there are very specific ridges that allow you to pass these cliff bands. You need to find these passes. The ridges that were ever-so-obvious on the ascent, are not visible on the descent. It only takes a bit of navigational skills, but if you are not attentive to your route, you may stray slightly in the wrong direction and be faced with a sheer cliff instead of the correct trail.
The trip down took us significantly less time than the trip up. We were practically speed walking downhill, as opposed to the uphill, step by step trudge we did on the way up.
Wrap up
Hiking Mt. Kinesava was all I had hoped for and more. While still ignorant to all the nooks and crannies of Zion after just one visit, I would put this hike at the top of my list for those who are seeking out a challenge. I also don’t want to give anyone who is not fit for the demanding task at hand any ideas, so please do consider your skill level and fitness before starting.
If you are thinking about tackling Mt. Kinesava, please do not hesitate to ask any questions in the comment section. I hope this photo explanation of the hike clears any doubts or concerns that you may have, what I wish I would have had when I was doing my research.
I’ll be back to Zion and Utah someday soon, and surely back to the top of Mt. Kinesava.

You need to use smaller pictures. These took way too long to load.
LikeLike
Hello, thanks for the feedback. They load instantly for me (I tested on multiple devices and multiple internet connections). What speed is your internet running at? Test here: https://www.speedtest.net/
LikeLike
FYI I made the images much lighter. They should load immediately.
LikeLike
FROM UNCLE LEE: Evanm, another fine piece of reporting. As always the photography verges on the spectacular — but how about having Madison face the camera just every once in a while? (Nik and Carli, too!) Your suggestion that hikers bring tweezers reminds me of why cowbo,ys wore leather chaps and Mexican vaqueros wore high tops on their leather boots — to keep those stickers away from their bodies! Good tip, the kind of tip that distinguishes a good reporter from the rest of the pack. I look forward to your next trip, whether it be a hike or a stroll.
Lee
LikeLike
Thanks for the comment Lee. Hope all is well.
LikeLike